Why GitHub is an Amazing Platform for Collaboration and Project Management – Farmaan
Introduction:
A successful project requires effective project management and collaboration. GitHub is an amazing resource in order to effectively and efficiently completing collaborative projects. GitHub contains various advantages and collaboration features for project managers. Some of GitHub’s various features include version control systems (VCS), commits, user repositories, and others.
Version Control Systems and Commits (VCS):
According to GitHub’s website, a version control system (VCS) is a system that tracks the history of changes as people and teams collaborate on projects together as a means of recovering earlier versions of projects GitHub Docs. This system allows project collaborators to see the exact changes made, who made said changes, the exact date and time changes were made, and why the changes were made. GitHub commits record the changes of files in branches. Commits record the specific changes made, when these changes were made, and who created the changes About Commits. Commits contribute towards efficient collaboration as it minimizes confusion about changes among team members.
User Repositories:
GitHub contains user repositories to store your code, files, and file revision history. Repositories can have multiple collaborators. Github repositories include branches, clones, forks, merges, pull requests, remote, and upstream repositories.
- Branch Repositories include parallel versions of code within one’s repository, but they do not affect the main repository branches.
- Clone repositories contain all repository data which can be downloaded.
- Fork repositories are new repositories which share code and visibility settings with original repositories.
- Merge repositories can apply changes from one branch to another.
- Pull Requests request merge changes between branches. Remote repositories are stored only on GitHub.
- Upstream repositories are branches of original repositories which have been forked or cloned About Repositories.
Conclusion:
GitHub makes group work easy with its various collaboration features. GitHub allows groups to work on projects together simultaneously. GitHub has no limits on the number of collaborators that can work on a singular project. GitHub allows project collaborators to make comments and have in-software discussions about project details through the use of the Issues feature and Pull Requests. GitHub provides collaborators with a Community Profile checklist to ensure that projects meet community standards to encourage and improve collaboration among group members GitHub for Collaboration and Best Practices. Project boards enable GitHub users to organize their work.
Here is a video link for a detailed overview of GitHub Version Control Systems:
Git Tutorial for Beginners – GitHub Version Control
Here is a video Link for a detailed overview of how to create a GitHub Repository:
How to Create a GitHub Repository Create a Repository in GitHub


Repository by National Cancer Institute
Here is a Video Link for a beginner’s Guide to GitHub:
GitHub Tutorial for Beginners
Resources:
GitHub for Collaboration and Best Practices
Git Tutorial for Beginners – GitHub Version Control
How to Create a GitHub Repository Create a Repository in GitHub
Repository by National Cancer Institute
Setting Up CI/CD Pipelines for GitHub Projects – Farmaan
Introduction:
What is a CI/CD Pipeline? How does it work? This blog post will provide an in-depth overview of how to set up a CI/CD Pipeline for GitHub Projects. This blog post will also explain GitHub Actions and workflow automation.
What is a CI/CD Pipeline?:
A CI/CD pipeline is a software development approach that includes elements of continuous integration (CI) and continuous delivery (CD) to maximize the effectiveness and efficiency of the development of software and apps CI/CD Overview. Continuous integration is a software development strategy that aims to improve the speed and quality of code developments What is Continuous Integration?. Developers change codes, creating automated build and test sequences that ensure new codes work within pre-existing codebases. Coders can efficiently fix coding errors as error messages appear when codes are blocked from CI platforms. Continuous Delivery is a software development technique which focuses on automated testing, frequent code integration, and rapid development to reduce development cycle times What is Continuous Delivery?. CD enables software developers to consistently change codes to produce codes with little manual intervention.
How CI/CD Pipelines Work + their Stages:
CI/CD pipelines combine individual CI and CD pipelines. Automagtion enables CI/CD temas to detect, verify and manage code changes immediately they occur, even after these codes are released for sale. CI/CD tools remove bottlenecks and support effective software resulting from collaboration and constant improvement CI/CD Overview. CI/CD pipelines coordinate the processes involved in CI and CD. CI/CD pipelines have building, testing, and deployment stages that validate code works to ensure they meet quality standards before the production stage. The CI/CD pipeline stages include the source code stage, the build stage, the testing stage, and the deploy stage.
Source Stage:
The source code stage is the starting point of the CI/CD pipeline construction. Here, codes are stored in a version control system such as GitHub or others. Developers merge their changes into shared repositories to maintain up-to-date versions that can be worked on by group members or other developers What is a CI/CD Pipeline?. Problems within this stage include conflicting changes, manage dependency issues, and branding and merging strategy issues. To avoid these issues, CI/CD pipelines monitor repository changes and generate validation steps What is a CI/CD Pipeline?.
Build Stage:
The build stage is where the CI/CD system compiles the source code into executable or deployable artifacts What is a CI/CD Pipeline?. The building stage also conducts code linting, static analysis, and other checks to ensure that codes meet quality standards and are syntactically correct before moving to the next stage. Unsuccessful builds will result in pipeline halts and failed updates. Developers will be notified immediately and resolve these issues.
Testing Stage:
The testing stage contains various complex testing methods by combining unit testing and integration testing to provide as much testing coverage as possible. Testing also provides software performance data which can be integrated into codes to create high-quality software What is a CI/CD Pipeline?. Developers will be notified and immediately fix any issues that occur within this stage.
Deploy Stage:
The Deploy stage enables developers to orchestrate software releases to production or elsewhere. Pipelines can be built for various functions. Pipelines can deploy codes on schedules, provide customers with software, and stop releases when issues occur. Developers are given the freedom to experiment and configure the best way to update software and provide them to customers What is a CI/CD Pipeline?.
Here is a video link on how to set up a CI/CD Pipeline:
How to Create a CI/CD Pipeline
Conclusion:
GitHub Actions enable users to automate software workflows. Workflow automation is the approach to automating different business processes, tasks, and workflows with little human intervention. Workflow automation leverages software and creates automated actions for the steps in business processes. Workflow automation acts as a guide for business teams to efficiently and effectively complete projects What is Workflow Automation and how to get Started. GitHub Actions enable users to create workflows that build and test repository pull requests or deploy merged pull requests to production Understanding GitHub Actions. Some of the numerous different GitHub Actions include hosted runners for every major OS, matrix builds, language-frienliness as they support all languages, live longs, built-in secret stores, and others. Each of these actions enables users to develop workflow automations and strengthen their CI/CD pipelines.
Here is a video link to How to Set Up a CI/CD Pipeline
How to set up a CI/CD Pipeline

Resources:
How to Setup a Simple CI-CD Pipeline using GitHub Actions and render.com
What is Continuous Integration?
What is Workflow Automation and how to get Started.
Understanding Basic Git Commands – Shaafi
Understanding the fundamental Git commands — git init, git clone, git pull, git add, git commit, and git push — is essential for efficient version control and collaboration.

Before we dive into definitions, the picture above illustrates how files move between different stages in Git. It shows:
- Local Workspace (Untracked/Modified Files):
- Where you make changes to files in your project.
- git add moves files to the staging area.
- git reset unstaged files if needed.
- Stage (Staging Area):
- Files are prepared for commit.
- git commit moves staged changes to the local repository.
- Local Repository (Committed Changes):
- Stores commit history locally.
- git push uploads commits to a remote repository like GitHub or GitLab.
- git fetch retrieves remote updates without merging.
- git pull fetches and merges changes from the remote repository into the local workspace.
Key Git Commands
- git init: Initializes a new Git repository in your current directory.
- git clone: Creates a local copy of an existing remote repository.
- git pull: Fetches and merges changes from a remote repository into your current branch.
- git add: Stages changes (new, modified, or deleted files) for the next commit.
- git commit: Records staged changes along with a descriptive message.
- git push: Uploads local commits to a remote repository.
Start a new project with GitHub:
1️⃣ Initialize a New Repository
Begin by creating a new directory for your project and initializing it as a Git repository:
| 1 | mkdir my-new-project |
| 1 | cd my-new-project |
| 1 | git init |
What happens here?
- mkdir my-new-project: Creates a new directory named my-new-project.
- cd my-new-project: Navigates into your new project directory.
- git init: Initializes an empty Git repository in the current directory.
2️⃣ Clone an Existing Repository
Alternatively, if you’re contributing to an existing project, clone the repository to your local machine:
What happens here?
- git clone: Copies the remote repository to your local machine, including all files, commits, and branches.
3️⃣ Pull Latest Changes
Before making changes, ensure your local repository is up-to-date:
| 1 | git pull origin main |
What happens here?
- git pull origin main: Fetches and merges changes from the remote repository’s main branch into your current branch.
4️⃣ Make Changes and Stage Them
Edit files as needed. After making changes, stage the modified files:
| 1 | git add filename1 filename2 |
What happens here?
- git add filename1 filename2: Stages the specified files, preparing them for commit.
To stage all changes at once:
| 1 | git add . |
5️⃣ Commit Your Changes
After staging, commit your changes with a descriptive message:
| 1 | git commit -m "Add feature X to improve functionality" |
What happens here?
- git commit -m “message”: Records the staged changes with a message describing what was done.
Writing clear and concise commit messages is vital for project maintainability. Here are some tips:
- Be Descriptive: Clearly state what changes were made and why.
- Use Imperative Mood: Start with verbs like “Added,” “Fixed,” “Updated.”
- Keep It Concise: Aim for a brief summary in the first line, followed by detailed information if necessary.
Example:
| 1 | git commit -m "Fix crash on startup by initializing config variables" |
For more detailed guidelines, refer to 🔗Conventional Commits
6️⃣ Push Changes to Remote Repository
Share your commits by pushing them to the remote repository:
| 1 | git push origin main |
What happens here?
- git push origin main: Uploads your local main branch commits to the remote repository.

By mastering these commands and adhering to best practices, you’ll establish a strong foundation in Git, enabling efficient collaboration and version control.
🎥 Watch this How To Clone Git Project (The right way) for a step-by-step guide!
💬 Have questions or feedback? Drop a comment below! 🚀
Best Practices for Open Source Collaboration and Contribution – Shaafi
Open-source is all about collaboration—people from around the world working together to build and improve software. But jumping into a project without understanding how things work can be overwhelming.
This guide will walk you through how to fork a repository, contribute effectively, submit pull requests, and follow best practices—whether you’re a first-time contributor or a project maintainer.
Before Getting Started:
✅ Understand the project – Read the documentation (README.md, CONTRIBUTING.md).
✅ Join the community – Engage in discussions (issues, forums, Discord, Slack).
✅ Follow contribution guidelines – Each project has rules for coding, testing, and submitting changes.
Step 1️⃣: Forking a Repository
You don’t edit an open-source project directly. Instead, you fork it—creating a copy in your GitHub account where you can work freely.
- Open the project on GitHub.
- Click the Fork button (top right).
- This creates a copy under your GitHub profile.

🔗 GitHub Guide: Forking a Repository
Step 2️⃣: Cloning and Creating a New Branch
Now that you have your own copy, you need to clone (download) it to your computer and create a new branch for your changes. Run the following in your terminal:
| 1 | cd project-name |
| 1 | git checkout -b my-new-feature |
- Cloning downloads the project to your local machine.
- Branching keeps changes separate from
main, ensuring safe collaboration.
🔗 GitHub Guide: Cloning a repository and creating a new Branch
💡 Think of branches like feature test runs—you don’t edit the main playbook until you’re sure your strategy works.
Step 3️⃣: Making and Committing Changes
Once you’ve made improvements, you need to stage and commit them. How to save your changes:
| 1 | git add . |
| 1 | git commit -m "Add feature X to improve performance" |
- “
git add ."stages all modified files. "git commit -m“ saves your changes with a short, meaningful message.
📌 Best Practice: Write commit messages that explain why a change was made, not just what was changed.
Step 4️⃣: Submitting a Pull Request (PR)
A Pull Request (PR) is how you propose your changes to the original project. To create and push a PR:
- Push your changes to your forked repo:
| 1 | git push origin my-new-feature |
2. Go to the original repository on GitHub.
3. Click “New Pull Request” and select your branch.
4. Write a clear description of your changes and submit the PR.
🔗 GitHub Guide: Creating a Pull Request
💡 A PR is like raising your hand in a team meeting—you’re proposing an idea and asking for feedback.
Step 5️⃣: Engaging with Maintainers and the Community
Your PR might not get accepted immediately. Be patient and open to feedback.
✅ Follow up on comments – Maintainers may request changes before merging.
✅ Stay respectful – Open-source is built on collaboration and constructive criticism.
✅ Follow the coding style – Each project has guidelines; stick to them.
💡 Think of it as a learning opportunity—experienced developers will guide you to improve your contribution.
For Project Maintainers: Best Practices for a Welcoming Community
Maintainers play a key role in making open-source projects inclusive and beginner-friendly. Here’s how to encourage contributions:
📌 Write a clear CONTRIBUTING.md – Outline the process for new contributors.
📌 Label issues clearly – Use good first issue and help wanted for newcomers.
📌 Engage with contributors – Provide feedback and help them improve.
📌 Maintain project health – Keep documentation updated and review PRs actively.
🔗 How to Write a Great CONTRIBUTING.md
It’s About Learning and Growing Together
Contributing to open-source isn’t just about code—it’s about:
🌍 Collaboration – Working with developers worldwide.
📚 Learning – Improving coding skills by working on real projects.
🚀 Building a reputation – Showcasing your work and networking in the dev community.
Go fork that repo, submit your first PR, and become part of something bigger!
🎥 Watch how contributing to Open Source can change your life!
💬 Have questions? Drop a comment below! 🚀
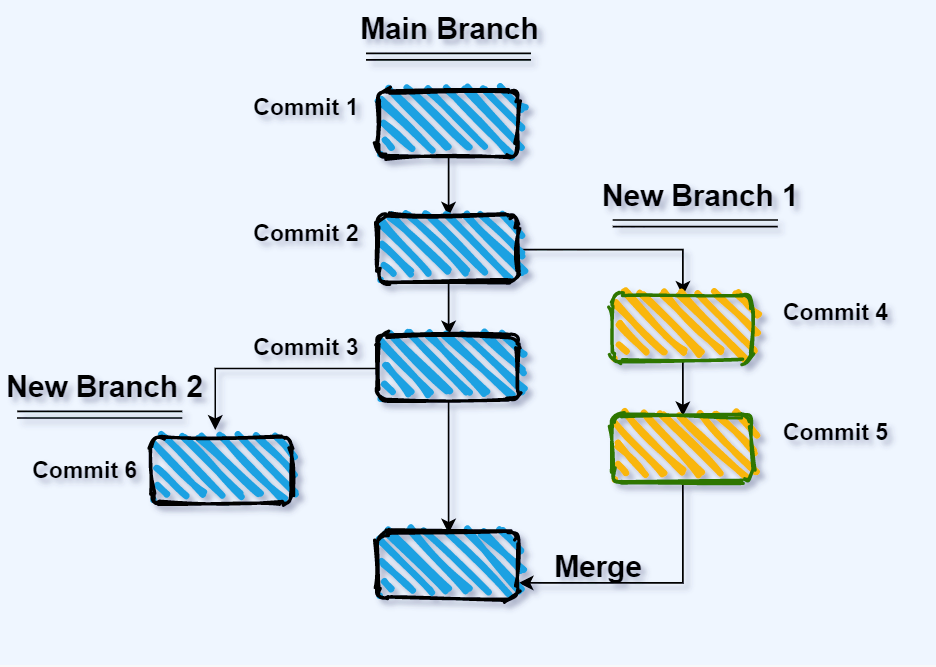
Branching and Merging: Mastering Collaboration in GitHub – Audri
Introduction
Ever worked on a group project where multiple people edit the same document? Without a structured approach, chaos ensues—overwriting each other’s work, confusion about the latest version, and plenty of frustration. GitHub solves this problem using branches, allowing developers to work on different features simultaneously without disrupting the main project.
Branches give you a safe space to experiment. Once your changes are ready, merging brings everything together. In this guide, we’ll break down how branches work, how to merge changes, and how to handle conflicts like a pro.
What is a Branch in GitHub?
Think of a branch as a parallel universe where you can make changes without affecting the main project. When you’re happy with the results, you can merge your branch back into the main codebase.
Why Use Branches?
✅ Work on new features without disturbing the main project
✅ Collaborate seamlessly with others
✅ Experiment freely—rollback if things go wrong
✅ Keep track of different versions
Every Git repository starts with a single branch called main (or master). Instead of making changes directly to main, developers create separate branches, work on them, and later merge them back.
Creating and Switching Branches
1️⃣ Creating a New Branch
To create a new branch in GitHub, run:
| 1 | git branch feature-branch |
This creates a branch called feature-branch but doesn’t switch to it.
2️⃣ Switching to Your New Branch
Use:
| 12 | git checkout feature-branch # Old methodgit switch feature-branch # Recommended method |
Now, any changes you make will be inside feature-branch.
🔗 Related Guide: GitHub Docs on Branching
Merging: Bringing Changes Together
Once you’re happy with your work, it’s time to merge your branch back into the main project.
1️⃣ Switching Back to main
| 1 | git switch main |
2️⃣ Merging Your Feature Branch
| 1 | git merge feature-branch |
If there are no conflicts, Git will smoothly integrate your changes.
Handling Merge Conflicts
Sometimes, Git can’t automatically merge changes, especially if two people edited the same file in different ways. That’s called a merge conflict.
1️⃣ Git Warns You About a Conflict
If a conflict occurs, Git will show something like this:
| 12 | Auto-merging index.htmlCONFLICT (content): Merge conflict in index.html |
2️⃣ Resolving the Conflict
Open the conflicted file, and you’ll see Git’s markings:
| 12345 | <<<<<< HEAD # Changes from main branch<p>Old content</p>======<p>New content from feature-branch</p>>>>>>> feature-branch |
Decide which version to keep (or combine them), then save the file.
3️⃣ Mark the Conflict as Resolved
| 1 | git add index.html # Mark resolved |
4️⃣ Complete the Merge
| 1 | git commit -m "Resolved merge conflict in index.html" |
Now your changes are safely merged!
🔗 Troubleshooting Guide: How to Resolve Merge Conflicts
Best Practices for Branching & Merging
✔️ Use meaningful branch names (e.g., fix-login-bug instead of new-branch)
✔️ Pull the latest changes before merging (git pull origin main)
✔️ Commit small, logical changes frequently
✔️ Write clear commit messages explaining why the change was made
✔️ Use Pull Requests (PRs) instead of merging directly to main
🔗 Learn More: Pull Requests & Code Review
Conclusion
Branching and merging are the foundation of smooth collaboration in GitHub. Whether you’re working solo or on a team, mastering these concepts will prevent messy code and improve productivity.
Ready to enhance your collaboration skills? Check out this detailed tutorial on Git Branching and Merging, where the process of branching and merging in Git is thoroughly explained, including how to use these features with GitHub in the feature branch workflow. Happy coding! 🚀
Git Branching and Merging – Detailed Tutorial
💬 Have questions or feedback? Drop a comment below! 🚀
Debugging and Resolving Git Issues: From Merge Conflicts to Resetting Commits – Audri
Introduction
Git is a powerful tool for version control, but let’s be honest—it can sometimes feel like a frustrating puzzle when things go wrong. Whether you’re dealing with merge conflicts, accidentally committed changes, or needing to reset your project, understanding how to fix common Git problems will save you from major headaches.
In this guide, we’ll cover the most frequent Git issues and how to resolve them step by step.
1️⃣ Merge Conflicts: Why Do They Happen?
What is a Merge Conflict?
A merge conflict happens when two branches modify the same part of a file differently. Since Git doesn’t know which version to keep, it asks you to resolve it manually.
How to Fix a Merge Conflict
1. Git warns you about a conflict:
| 123 | git merge feature-branchAuto-merging index.htmlCONFLICT (content): Merge conflict in index.html |
2. Open the conflicted file (e.g., index.html) and you’ll see:
| 12345 | <<<<<< HEAD # Changes from the main branch<p>Old content</p>======<p>New content from feature-branch</p>>>>>>> feature-branch |
3. Choose which version to keep, remove Git’s conflict markers (<<<<<<, ======, >>>>>>), and save the file.
4. Mark the conflict as resolved:
| 1 | git add index.html |
5. Complete the merge:
| 1 | git commit -m "Resolved merge conflict in index.html" |
Now your branch is successfully merged!
🔗 GitHub Docs: How to Resolve Merge Conflicts
2️⃣ Undoing Mistakes: Resetting and Reverting Commits
Sometimes, you make a commit and realize you’ve messed up. Don’t panic! Git provides different ways to fix mistakes.
Scenario 1: Undo the Last Commit (But Keep Changes)
If you committed too early and want to edit your changes before pushing:
| 1 | git reset --soft HEAD~1 |
This moves your last commit back to the staging area so you can modify it.
Scenario 2: Undo the Last Commit (And Remove Changes)
If you want to completely discard the last commit:
| 1 | git reset --hard HEAD~1 |
⚠️ Warning: This permanently deletes your changes.
Scenario 3: Revert a Commit Without Losing History
Instead of deleting a commit, you can create a new commit that undoes a previous one:
| 1 | git revert <commit-hash> |
This is useful when working in a team because it preserves history.
🔗 GitHub Docs: How to Revert a Commit
3️⃣ Fixing an Accidental Commit to the Wrong Branch
Oops! You committed changes to the wrong branch. Here’s how to fix it:
- Undo the commit but keep the changes:
git reset HEAD~1 - Switch to the correct branch:
git switch correct-branch - Recommit the changes:
git add . git commit -m "Moved changes to the correct branch"
🔗 GitHub Docs: Git Reset vs. Revert
4️⃣ Deleting a Branch Safely
Once a feature branch is merged, it’s good practice to delete it to keep your repo clean.
Delete a Local Branch:
| 1 | git branch -d feature-branch |
If Git warns that the branch isn’t fully merged and you really want to delete it:
| 1 | git branch -D feature-branch |
Delete a Remote Branch:
| 1 | git push origin --delete feature-branch |
🔗 GitHub Docs: Deleting a Branch
Conclusion
Git issues happen to everyone, but now you know how to debug, reset, revert, and merge with confidence! Whether you’re dealing with merge conflicts, committing to the wrong branch, or needing to roll back changes, these fixes will keep your workflow smooth.
🎥 To further enhance your Git skills, consider watching the following tutorial:
💬 Have questions? Drop a comment below! 🚀
Pull Requests and Code Review: The GitHub Workflow for Team – Paurav
Collaboration is the backbone of software development, and GitHub has become the go-to platform for teams to work together efficiently. One of the most critical aspects of collaboration is maintaining clean, high-quality code. This is where pull requests (PRs) and code reviews come in. Whether you’re contributing to an open-source project or working in a team on a private repository, understanding how to create pull requests and conduct code reviews is essential.
What is a Pull Request?
A pull request (PR) is a request to merge changes from one branch into another. It allows team members to review, discuss, and approve changes before they are merged into the main codebase. Think of it as submitting an assignment for grading—your peers and team leads will check your work before it gets accepted.

Step-by-Step Guide: Creating a Pull Request on GitHub
Step 1: Fork and Clone the Repository (If Contributing to Open Source)
If you are contributing to an open-source project, first fork the repository and then clone it to your local machine.
| 1234 | # Fork the repository on GitHub# Clone it to your local machinegit clone https://github.com/your-username/repository-name.gitcd repository-name |
Step 2: Create a New Branch
Always create a new branch for your changes rather than working directly on the main or master branch.
| 1 | git checkout -b feature-branch-name |
Step 3: Make Changes and Commit
Modify the code as needed. Once done, stage and commit your changes.
| 12 | git add .git commit -m "Added new feature X" |
Step 4: Push the Changes
Push the changes to your repository on GitHub.
| 1 | git push origin feature-branch-name |
Step 5: Open a Pull Request
- Go to your GitHub repository.
- Navigate to the Pull Requests tab.
- Click New Pull Request.
- Select your feature branch as the source and main branch as the destination.
- Add a title and description explaining your changes.
- Click Create Pull Request.
Tip: Write clear, descriptive PR titles and descriptions so that reviewers understand the purpose of your changes.
The Importance of Code Review
A pull request is not complete until it has been reviewed and approved by your team members. Code review ensures that:
- Bugs and potential issues are caught early.
- Code follows best practices and team guidelines.
- The implementation aligns with project goals.
- Developers learn from each other, improving overall team quality.
How to Review a Pull Request on GitHub
- Navigate to the Pull Requests section of the repository.
- Click on a pending PR.
- Go through the changed files.
- Add comments where needed.
- If everything looks good, click Approve & Merge.
Tip: Use inline comments to suggest improvements and provide constructive feedback.
Best Practices for Code Review
- Be polite and constructive – Frame suggestions positively.
- Look for logical errors – Ensure the code functions correctly.
- Check for style and formatting – Follow team conventions.
- Suggest better approaches – Help improve efficiency and readability.
Approving and Merging a Pull Request
Once a PR is reviewed and approved:
- Click Merge Pull Request.
- Choose Squash and Merge (for cleaner commit history) or Rebase and Merge.
- Delete the feature branch if it’s no longer needed.
After merging, sync your local repository with:
| 123 | git checkout maingit pull origin maingit branch -d feature-branch-name |
Video Guide:
Conclusion
Mastering pull requests and code reviews is an essential skill for every developer. Whether you’re contributing to open-source projects or working within a team, these practices ensure high-quality, maintainable code.
By following the steps outlined above, you’ll be well on your way to effective collaboration and seamless development workflows.
Happy Coding!
Further Reading:
Securing Your GitHub Workflow: Commit Signing, Branch Protection & Security – Paurav
Security is a fundamental aspect of software development. While GitHub provides a seamless workflow for collaboration, it is equally important to ensure that every contribution is authentic, verified, and protected from malicious or accidental changes. In this guide, we will explore three key security measures: commit signing with GPG keys, branch protection rules, and enforcing security best practices.
Commit Signing with GPG Keys
What is Commit Signing?
Commit signing is a way to verify the identity of contributors in a Git repository. By signing commits with a GPG (GNU Privacy Guard) key, developers can prevent tampering and ensure that code changes originate from a trusted source.
When a commit is signed and pushed to GitHub, a ✅ Verified badge appears next to it, indicating that the commit has been authenticated.
Why is Commit Signing Important?
- Prevents commit forgery.
- Ensures accountability for each contribution.
- Adds an additional layer of security to repositories.

From https://github.blog/changelog/2022-08-23-ssh-commit-verification-now-supported/
How to Set Up GPG Commit Signing
Step 1: Install GPG
On macOS:
| 1 | brew install gnupg |
On Ubuntu/Debian:
| 1 | sudo apt update && sudo apt install gnupg |
Step 2: Generate a GPG Key
| 1 | gpg --full-generate-key |
Select the following options:
- RSA and RSA (default)
- 4096-bit key for strong encryption
- Key expiration: Choose a suitable time frame
- Your name and email (same as your GitHub email)
Step 3: Export and Add Your Key to GitHub
| 1 | gpg --list-secret-keys --keyid-format LONG |
Copy the GPG key ID and export it:
| 1 | gpg --armor --export YOUR-KEY-ID |
Go to GitHub → Settings → SSH and GPG keys and add your key.
Step 4: Configure Git to Use GPG
| 12 | git config --global user.signingkey YOUR-KEY-IDgit config --global commit.gpgsign true |
Now, every commit you make will be signed and verified on GitHub!
Further Reading: GitHub Docs on GPG Signing
Video Guide:
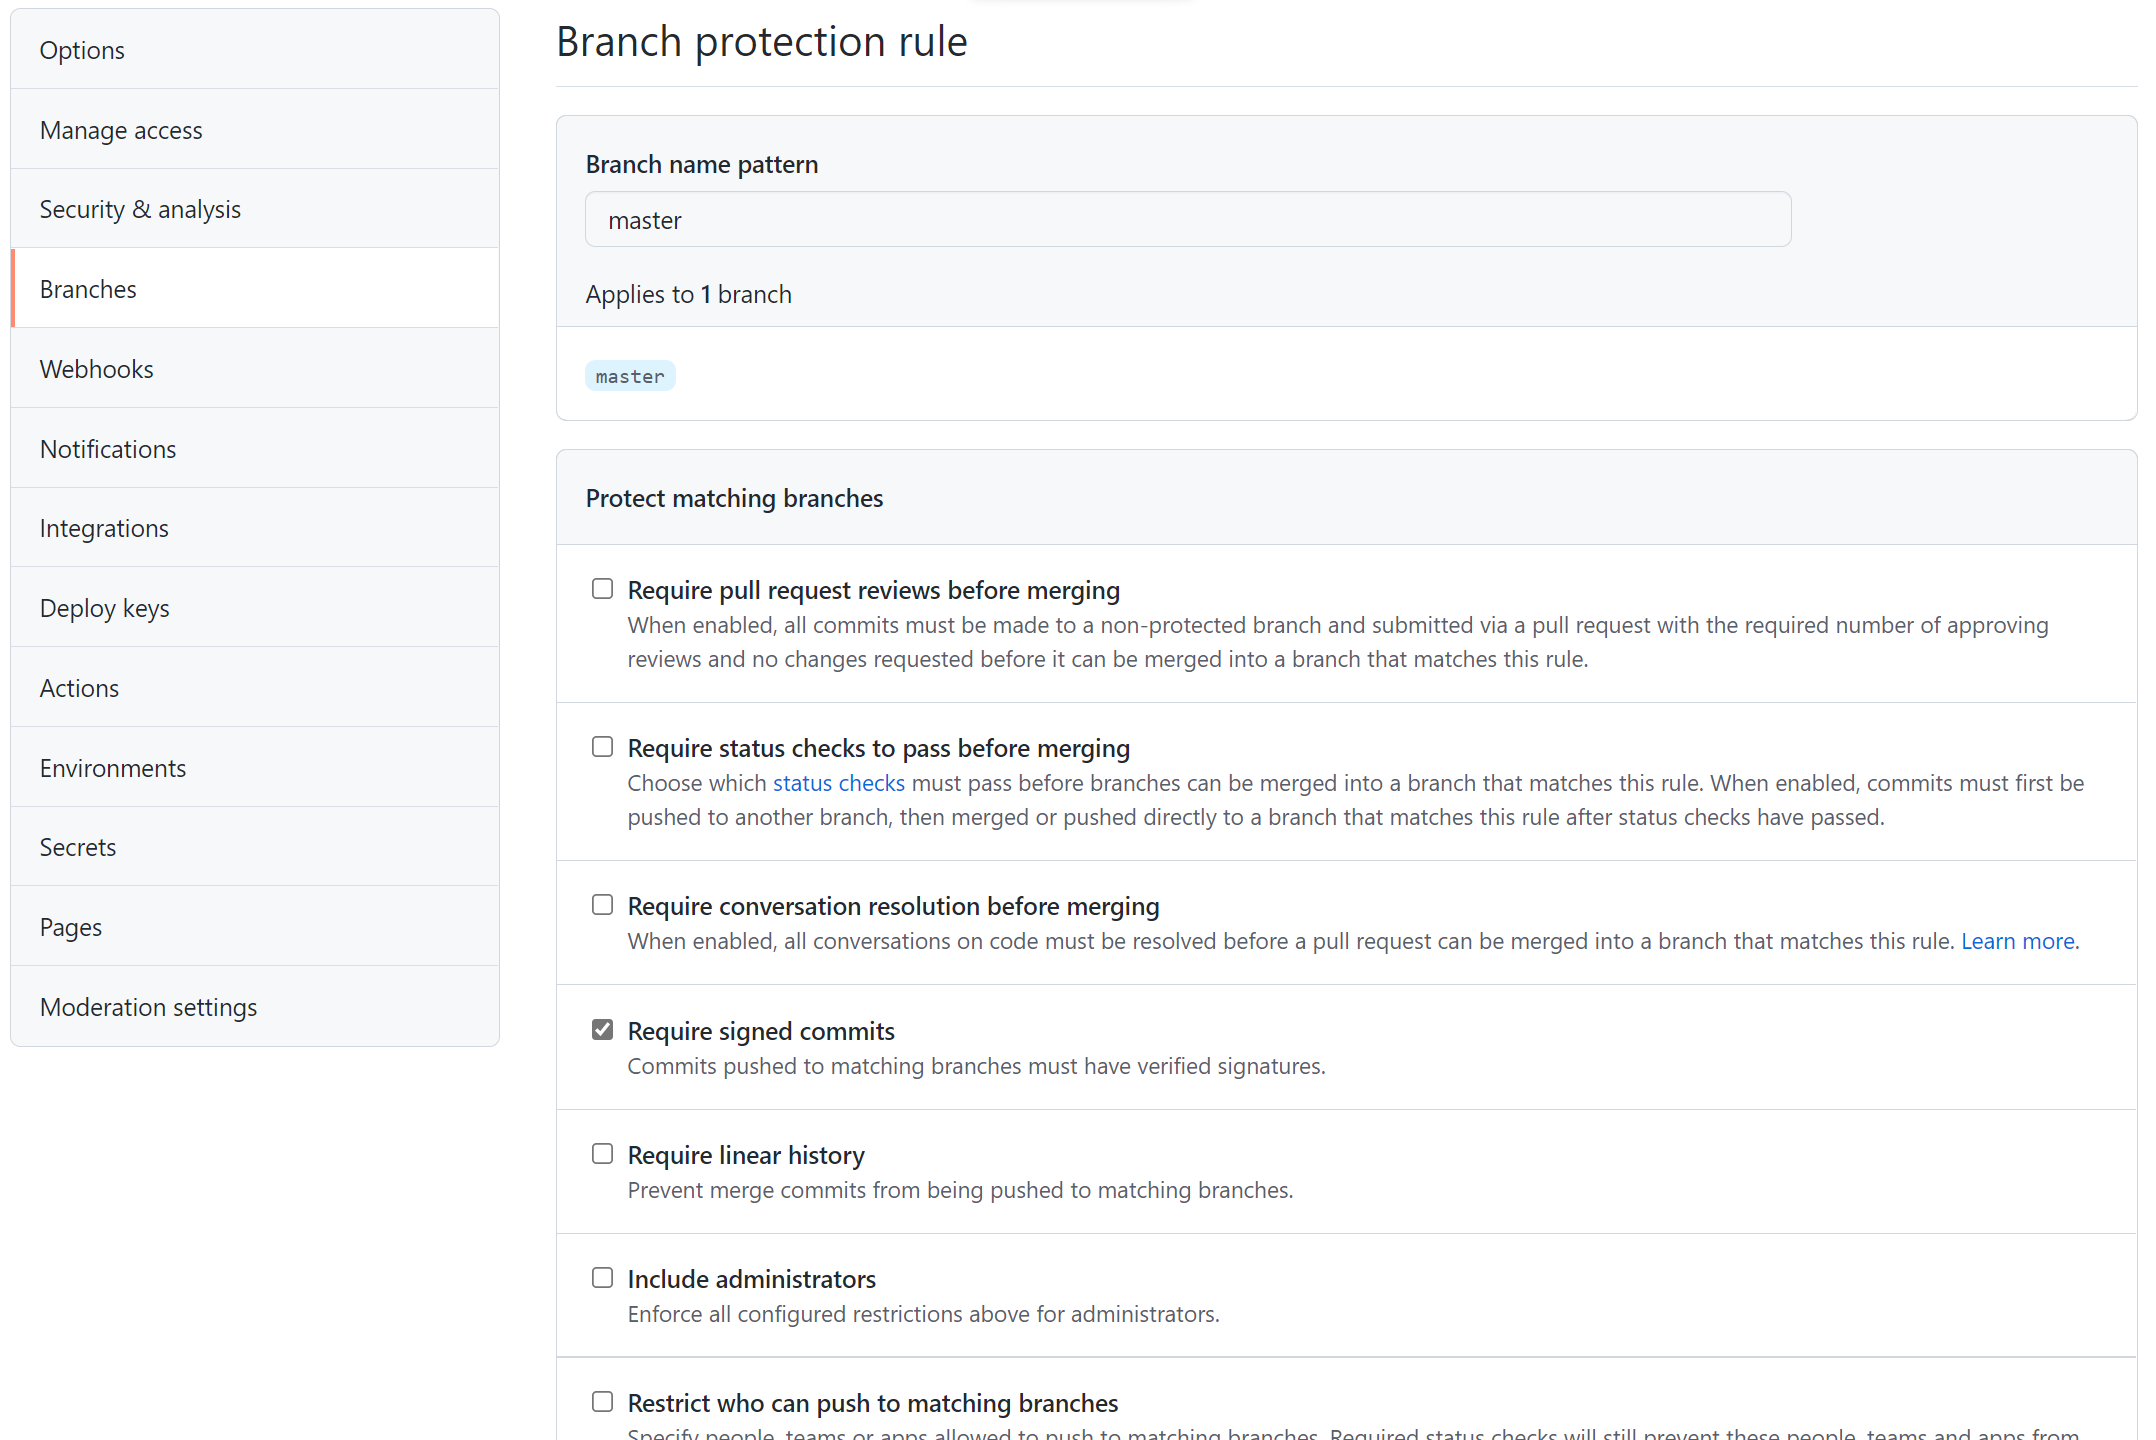
Branch Protection Rules: Keeping Your Code Secure
Why Do We Need Branch Protection?
When working in teams, mistakes happen—force-pushing to main, merging incomplete features, or skipping code reviews. Branch protection rules help prevent these issues by enforcing best practices.
Key Branch Protection Rules on GitHub
- Require Pull Requests (PRs) Before Merging
- Prevents direct pushes to
main - Ensures all changes go through review
- Prevents direct pushes to
- Require Status Checks to Pass Before Merging
- Runs automated tests (CI/CD pipelines)
- Blocks faulty code from merging
- Enforce Code Reviews
- Requires approval from team members
- Encourages collaboration and security audits
- Restrict Who Can Push to Critical Branches
- Only specific users can modify protected branches
- Prevents unauthorized changes
From https://www.cloudwithchris.com/blog/use-github-branch-protection-rules/
How to Enable Branch Protection on GitHub
- Go to your repository on GitHub.
- Navigate to Settings → Branches.
- Under Branch Protection Rules, select
main. - Enable:
- Require pull request reviews before merging.
- Require status checks to pass before merging.
- Restrict who can push to the branch.
- Click Save changes.
Further Reading: GitHub Docs on Branch Protection
Enforcing Security Best Practices in GitHub
1. Enable Two-Factor Authentication (2FA)
- Adds an extra layer of security for developers.
- Prevents unauthorized access even if passwords are compromised.
2. Use Dependabot for Automated Security Fixes
GitHub’s Dependabot scans your repository for vulnerabilities and automatically opens PRs with security patches.
- How to Enable:
- Go to Settings → Security & analysis.
- Enable Dependabot alerts and updates.

From https://i0.wp.com/user-images.githubusercontent.com/5788563/150418619-3311f32f-9127-4d7a-9b2c-c3f4609ad066.png?ssl=1
3. Secret Scanning & Token Protection
- GitHub automatically scans repositories for accidentally committed API keys or secrets.
- If detected, GitHub alerts the repository owner immediately.
Further Reading: GitHub Docs on Secret Scanning
Conclusion
Security should never be an afterthought when working with GitHub. By implementing GPG commit signing, branch protection rules, and security best practices, teams can protect their repositories from malicious activity and accidental errors.
By following these steps, you ensure:
Verified, tamper-proof commits
Strict control over critical branches
Proactive security measures
Start securing your GitHub workflow today!
Further Reading: